Introduction

Thank you for checking out Snow! Snow is a classic Macintosh emulator, emulating Motorola 68k-based Macintosh models. It aims to be user-friendly as well as an accurate emulation of the original hardware.
Providing an accurate emulation means that Snow does not hook into the ROM or software running on the Macintosh but instead emulates all the underlying hardware. This allows Snow to, for example, run applications off original floppy images with the copy protection intact.
It currently emulates the following Macintosh models:
- Macintosh 128K, 512K and 512Ke
- Macintosh Plus
- Macintosh SE (non-FDHD and FDHD)
- Macintosh Classic
- Macintosh II (non-FDHD and FDHD)
If you're looking to obtain Snow, head over to Obtaining binaries.
If you run into any issues along the way, you can:
Obtaining binaries
You can obtain binaries for Windows, Linux and MacOS from the website.
Building from source
Prerequisites
Snow is written in the Rust programming language. To install the official Rust toolchain, simply follow the steps on rustup.rs.
Snow uses a rust-toolchain.toml file to specify the version of the Rust toolchain it requires.
Cargo will download and install this version automatically (if needed) when you build.
Building Snow depends on having SDL2 available on your system as well as pkg-config to find the
library.
On Mac, if you have brew installed, you can install the dependencies using:
brew install pkg-config sdl2
On Linux, the name of your packages depends on your distribution, but they should be generally available. On Debian or Ubuntu, you can run:
sudo apt install libsdl2-dev pkg-config
Building and running from source
To build and run the GUI after checking out the source, simply run:
cargo run -r
Running tests
If you plan on developing Snow, you may want to run the unit test suite. As a prerequisite, you need the m68000 single step test submodule checked out. To do this, run:
git submodule update --init --recursive
Then, you need to generate the JSON files for the single step tests. You only have to do this once. Run:
cd testdata/m68000
python decode.py
After this, you can run the unit tests from the root directory of the Snow repository using:
cargo test
Starting a system
Obtaining ROM files
In order to emulate a Macintosh, you need a ROM file for the model you want to emulate. You can obtain these from an original system you own or through other means. I cannot help you to obtain ROMs.
Loading a ROM file
You can simply drag a ROM into the emulator window to quickly run the emulator. This starts the emulator with the default settings and does not work for Macintosh II (as that needs a Display Card ROM).
Through the 'Load ROM' dialog
To load a ROM file, go to 'Machine > Load ROM' in the menu or click the memory icon in the toolbar.
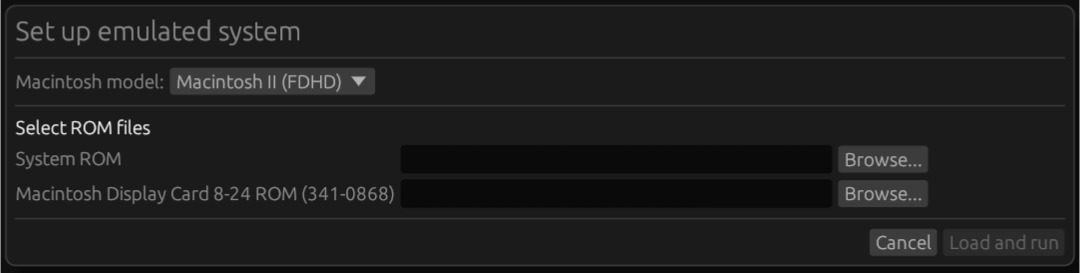
In the dialog that comes up, select the Macintosh model you want to emulate and browse for the system ROM.
To emulate the Macintosh II, you also need the ROM of the Macintosh Display Card 8-24. This ROM is usually labeled 341-0868.bin.
Snow will validate whether your ROM file is correct for the selected model and the integrity of the file.
check_circle indicates the correct file was selected.
error indicates the selected file is not correct. An error message will tell you what's wrong.
Once everything is good, you can click 'Load and run' to proceed. Snow will remember the location of the ROM for each model so it is easy to launch the same model next time.
Advanced settings
In the 'Load ROM' dialog additional advanced settings can be configured:
- Persist PRAM: loads and saves the RTCs PRAM into a file rather than starting blank and keeping it in memory.
- Extension ROM: allows for loading an additional ROM into the extension ROM memory region of the emulated Mac.
- Mouse emulation: see mouse emulation.
- Use 800K floppy drive on Macintosh 128K/512K: attaches an 800K, double-sided floppy drive to these models. This is non-standard but allows for emulating some interesting scenarios where these combinations do work.
- Disable ROM validation: does not check whether the provided ROM file(s) are valid for the selected model. This allows for loading modified ROMs.
- Start in fast-forward mode: see debugging.
Working with media
Snow supports the following storage media:
Floppies
Snow supports 2 or 3 floppy drives, depending on the model you are emulating. The following drives are available, per model:
- Macintosh 128K/512K: 2 400K drives
- Macintosh 512Ke: 2 800K drives
- Macintosh Plus: 2 800K drives
- Macintosh SE (non-FDHD): 3 800K drives
- Macintosh SE (FDHD): 3 1.44MB SuperDrives
- Macintosh Classic: 2 1.44MB SuperDrives
- Macintosh II (non-FDHD): 2 800K drives
- Macintosh II (FDHD): 2 1.44MB SuperDrives
PC floppies can be used in the models with SuperDrives, provided you have the 'PC Exchange' extension installed within the emulated system.
Supported image types
Snow supports sector, bitstream and flux image files. Raw flux (e.g. A2R) is also supported, but since these images are not ment for emulator use, it is recommended to convert them to resolved flux or bitstream (if flux accuracy is not required) first.
Writing to flux images is (currently) not supported, these will always be mounted as write-protected.
Snow supports the following image file formats for reading:
- Apple DiskCopy 4.2 (sector-based)
- Apple Disk Archive / Retrieval Tool ('DART') (sector-based)
- Applesauce A2R 2.x and 3.x (raw flux)
- Applesauce MOOF (bitstream and flux)
- PCE Flux Image (PFI, flux)
- PCE Raw Image (PRI, bitstream)
- Raw images (sector-based)
- Any format (Mac 1.44MB or PC) supported by Fluxfox
Snow supports saving images to Applesauce MOOF format.
Loading a floppy image
To load a floppy image, go to the 'Drives' menu, to the drive you want to use, and select 'Load image' to browse to the image you want to load.
In the image browser you can view the metadata for the selected image on the right side. To mount an image as write-protected, check the 'Mount write-protected' box. Note that Snow will not automatically write back to your image file, even if an image is not mounted write-protected.
You can also mount an empty (400K/800K only currently) floppy which you can format and write to by selecting 'Insert blank 400K/800K floppy'.
Ejecting floppies
Floppies should preferably be ejected gracefully through the emulated operating system. To do this, drag the floppy icon on the desktop to the trash.
If your emulated system ejected your floppy and you want to re-insert it including any changes that were made, you can click 'Re-insert last ejected floppy' in the menu for that drive.
Note: if you do not use 'Re-insert last ejected floppy' but instead load the original image after the OS has written to it, the OS will not recognize it as the same floppy!
To forcibly eject a floppy, use the 'Force eject' menu item. This is equivalent to using a paperclip to forcibly eject a floppy on real hardware.
Writing to floppies
When a floppy is written to, the icon in the menu bar will change:
- save indicates the floppy has not been written to.
- save_as indicates the floppy was written to since it was mounted.
To save a floppy including any changes, use the 'Save image...' item. If the floppy was ejected, you can use 'Save last ejected image...' to save the image from before the floppy was ejected, including changes.
Note that Snow will never automatically write back to loaded floppy images - every save must be done explicitly.
Floppy images are always saved in MOOF format.
Hard drives
Snow supports up to 7 SCSI hard drives in every emulated Macintosh model except the Macintosh 128K/512K/512Ke (as these models never included SCSI).
To perform actions on a specific SCSI HDD, go to 'Drives > SCSI #n' where 'n' is the SCSI ID of the drive (0 to 6).
Creating a blank drive image
To create a blank hard drive image within Snow, use the 'Create new HDD image...' menu action. This will present the following dialog:
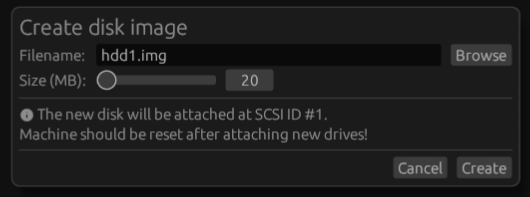
Browse to pick a filename and select the desired size and click 'Create'.
After creating a new disk, you must reset or restart the emulated system for it to be recognized.
To initialize and use a new disk in the emulated system, use the MacOS 'HD SC Setup' tool. It is often found on the 'Disk Tools' floppy as part of a MacOS floppy set. This floppy is bootable.
Mounting an existing image
For hard drives, Snow uses 'device images'. These are images of an entire hard drive from beginning to end, including the partition table, all the partitions and the SCSI driver. Other emulators, such as Mini vMac, use 'volume images', which is an image of only a single HFS volume/partition. Volume images are not compatible with Snow because they contain insufficient data for the Mac to boot. If you want to convert a volume image to a device image you can use in Snow, see Converting volume images.
To mount an existing image file, use the 'Load HDD disk image...' menu action to browse for a disk image. Note that an image file must be a multiple of 512 bytes (the SCSI sector size) and must be an image of a full drive.
After mounting a disk, you must reset or restart the emulated system for it to be recognized.
Detaching a disk
To detach a mounted disk, use the 'Detach' menu item under a hard drive in the 'Drives' menu.
Note that this is the equivalent of pulling the cable on a hard drive so if the disk is in use by the emulated operating system, it will likely crash and/or damage the image. Shut down the emulated operating system first.
Branching off an image
Branching off an image means that the file that is currently loaded is copied to a new file with a different filename and possibly location, the original file is closed and Snow will continue working from the newly created copy. This function is useful when working with save states.
To branch off an image, use the 'Branch off image...' menu item under a hard drive in the 'Drives' menu.
CD-ROM drives
Snow supports CD-ROM drives in every emulated Macintosh model except the Macintosh 128K/512K/512Ke (as these models never included SCSI).
Note that in order to use a CD-ROM drive, you need to have the 'Apple CD' extension installed in the emulated operating system. This requires System 6 or higher, although System 7 is preferable (see 'Troubleshooting' below).
Attaching a CD-ROM drive
To attach a drive, use the 'Drives > SCSI #n > Attach CD-ROM drive' (where 'n' is the SCSI ID of the drive (0 to 6)) on an unused SCSI slot. You can either load an image immediately or attach an empty drive.
Note that you need to restart the emulated system for the drive to be recognized.
Mounting an existing image
To mount an existing image file, use the 'Load image...' menu action to browse for a CD image. Currently, ISO and TOAST files are supported.
It is also possible to drag a file of a supported image format into the Snow emulator window, which will load it into the first available empty CD-ROM drive.
Creating an image out of files on the host system
Snow can create a temporary ISO image out of existing files on the host system and mount it on an emulated CD-ROM drive as a means of transfering files from the host to the emulated system.
To do this, use the 'Mount image from files...' menu item.
Ejecting a CD
To eject a CD, use the eject function in the emulated operating system (drag the CD to the trash can).
Detaching a drive
To detach a CD-ROM drive, use the 'Detach' menu action.
Note that this is the equivalent of pulling the cable on a hard drive so if the disk is in use by the emulated operating system, it will likely crash. Shut down the emulated operating system first.
Troubleshooting
On System 6, when you try to insert a CD, you may get the following message:
Please unlock the disk "Disk name" and try again. The desktop file couldn't be created..
This is a System 6 issue which also occurs on real hardware. Install
the "Desktop Mgr" extension inside the emulated system to solve this, or
update to System 7.
Keyboard/mouse
Keyboard
For non-ADB Macintosh models (128K, 512K, 512Ke and Plus), Snow emulates the Apple M0110 keyboard with the following layout:
,---------------------------------------------------------.
|  `|  1|  2|  3|  4|  5|  6|  7|  8|  9|  0|  -|  =|Backs|
|---------------------------------------------------------|
|Tab  |  Q|  W|  E|  R|  T|  Y|  U|  I|  O|  P|  [|  ]|  \|
|---------------------------------------------------------|
|CapsLo|  A|  S|  D|  F|  G|  H|  J|  K|  L|  ;|  '|Return|
|---------------------------------------------------------|
|Shift   |  Z|  X|  C|  V|  B|  N|  M|  ,|  .|  /|        |
`---------------------------------------------------------'
     |Opt|Mac |         Space               |Enter|Opt|
     `------------------------------------------------'
For Macintosh models with ADB, Snow emulates the Apple extended keyboard M0115 with the following "U.S. Domestic" layout:
,---.   .---------------. ,---------------. ,---------------. ,-----------.             ,---.
|Esc|   |F1 |F2 |F3 |F4 | |F5 |F6 |F7 |F8 | |F9 |F10|F11|F12| |PrS|ScL|Pau|             |Pwr|
`---'   `---------------' `---------------' `---------------' `-----------'             `---'
,-----------------------------------------------------------. ,-----------. ,---------------.
|  `|  1|  2|  3|  4|  5|  6|  7|  8|  9|  0|  -|  =|Backspa| |Ins|Hom|PgU| |NmL|  =|  /|  *|
|-----------------------------------------------------------| |-----------| |---------------|
|Tab  |  Q|  W|  E|  R|  T|  Y|  U|  I|  O|  P|  [|  ]|  \  | |Del|End|PgD| |  7|  8|  9|  -|
|-----------------------------------------------------------| `-----------' |---------------|
|CapsLo|  A|  S|  D|  F|  G|  H|  J|  K|  L|  ;|  '|  Return|               |  4|  5|  6|  +|
|-----------------------------------------------------------|     ,---.     |---------------|
|Shift   |  Z|  X|  C|  V|  B|  N|  M|  ,|  ,|  /|Shift     |     |Up |     |  1|  2|  3|   |
|-----------------------------------------------------------| ,-----------. |-----------|Ent|
|Ctrl |Opt | Cmd |        Space            | Cmd |Opt |Ctrl | |Lef|Dow|Rig| |      0|  .|   |
`-----------------------------------------------------------' `-----------' `---------------'
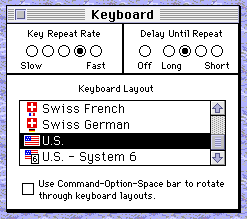
These are currently the only keyboard layouts supported. If you experience issues with incorrect key presses inside the emulated system, particularly with localized operating systems, change the keyboard layout to "U.S." or "U.S. Domestic" (Apple menu > Control Panel > Keyboard).
Command key
To use the Command key on a MacOS host, you can simply use the Command button on the host system.
On Windows and Linux hosts, you can use the right ALT key. The 'Super' key (the Windows key) is also mapped to the Command key, but this key is often not forwarded by the operating system. On Windows, you can use SHIFT+WIN to press the Command key, but since this is rather inconvenient, Snow provides the right ALT as an alternative.
To enable or disable mapping the right ALT to Command, use the menu item 'Options > Map right ALT to Cmd'. This option is saved in the workspace.
Mouse
Snow supports two ways of emulating the mouse, which can be chosen under 'Advanced' in the Load ROM dialog.
Absolute positioning (default)
Absolute mouse positioning to provide an intuitive way of using the mouse. Moving the mouse cursor over the display of the emulated system will move the mouse on the emulated system. When entering the edge of display, the cursor will immediately jump to that location. The speed of the mouse matches that of the host system.
To achieve this, Snow patches a couple of global variables in the memory of the Mac. This makes this mode unsuited for certain games and non-original operating systems and ROMs.
Relative positioning / hardware mouse emulation
This mode emulates the Macintosh mouse on the lowest level, but since hardware mice only signal relative movement to the computer, it only passes relative movements to the emulated system. This may make it harder to control the mouse, but it provides the most accurate emulation experience and works best with some games (e.g. first person shooters) and non-original software.
Relative positioning mode works best when using Snow fullscreen.
Workspaces
The Snow user interface has a 'workspace' concept. You can load and save workspaces from the 'Workspace' menu.
The following things are saved into a workspace file and restored when you load it:
- The emulated machine type and selected ROMs
- Attached SCSI devices and disks (note that removal media is not persisted)
- The open windows, their position and size
- The configured display scale and whether the viewport is vertically centered
Paths in the workspace files are relative to the workspace file itself. Keep that in mind when you move or copy files around.
Fullscreen mode
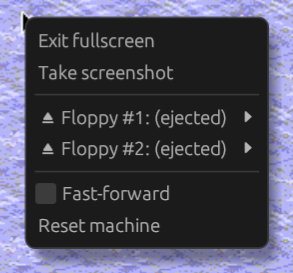
To enter fullscreen mode, click the fullscreen toolbar button or use the 'View > Enter fullscreen' menu item.
While in fullscreen mode, right-click to open a context menu to exit fullscreen or perform other emulator actions.
When working mostly in fullscreen mode or when playing games in fullscreen mode, use relative mouse positioning mode for the best experience.
Starting in fullscreen mode
To start Snow in fullscreen mode, you can use the -f or --fullscreen
command line argument. You have to specify a workspace or ROM to load
when starting in fullscreen mode. For example:
./snowemu -f mymac.snoww
./snowemu -f macplus.rom
Save states
Save states are a complete snapshot of the entire state of the emulated system into a file. This allows you to resume an emulation session from any point where you saved. This can be useful while debugging (to rewind quickly to a point in time), while playing a game (rewind to an earlier point in your game) or to quickly resume an emulation session after closing Snow.
You can save and rewind from either quick save slots or from files from the 'State' menu in the menu bar.

By default when loading a save state the emulator will start running immediately. To pause the emulator when a save state is loaded, tick the 'Pause emulator after state load' checkbox in the menu. This option is saved in the workspace.
Loading/saving state from quick save slots
To save to a quick save slot, click the slot under the 'Quick save states' header in the menu. If there is an existing save in the slot, it is overwritten.
To load a save state from a quick save slot, click the slot under the 'Quick load states' header in the menu. A slot can only be selected if there is a save in the slot.
Quick save slots are saved as temporary files which are deleted when Snow exits, and therefore lost. If you need to keep a save state, save it to a file, instead. During the session they can be used even across different emulated models and also persist when a different workspace is loaded.
Loading/saving state from files
Save states can also be saved to files to persist them even after Snow exits. Use the 'Load state from file...' and 'Save state to file...' options to load or save, respectively.
Save states use the .SNOWS extension. They include a screenshot that shows in the state loading file browser dialog. State files are compressed to save disk space.
Snow will show a warning in the file browser to indicate when a state file is selected that was not created by the same version.
Disk images and save states
A snapshot of every disk image (hard drives and CD-ROM) is packed into the save state when it is saved. This allows rewinding to an earlier state of the image without having to worry about inconsistencies if the disk image gets modified by the emulated system later on.
When a save state is reloaded, each disk image snapshot is re-created as a temporary file, which is lost when Snow exits. This means, if you have loaded a save state and want to keep the disk image from after the state load, you must branch off the disk image to another (new) file.
Floppy images are also stored in the save state but are never actively written back as the emulator runs and therefore do not need special attention.
Debugging
Snow provides execution control over the emulated system and various views useful for debugging.
To control execution of the emulated system, the following toolbar buttons or their respective actions in the 'Machine' menu can be used:
- restart_alt - Reset: resets the emulated machine
- play_arrow - Run: resumes execution
- pause - Pause: pauses execution
- fast_forward - Fast forward: runs the emulation at a faster pace, as fast as the host system allows. While in this mode, sound is muted.
- step_into - Step into: steps the emulated CPU for a single instruction
- step_over - Step over: steps the emulated CPU for a single instruction, unless a call instruction is encountered. If a call instruction is encountered, the CPU will run until it returns from the subroutine or exception handler.
- step_out - Step out: runs the emulated CPU until it returns from the current subroutine or exception handler.
See the next chapters for further debugging features and gaining insight and manipulating code execution flow and memory.
Breakpoints
Snow supports several types of breakpoints:
- Execution breakpoints: breaks execution when PC arrives at a certain location in the execution flow.
- Bus access breakpoints: breaks when the CPU reads or writes a specified bus address.
- A-line/system trap breakpoint: breaks when a certain A-line instruction is executed. The Macintosh uses these unimplemented instructions as 'system traps' or 'system calls'.
- F-line trap breakpoint: breaks when a certain unimplemented F-line instruction is executed. The 68k CPUs used this instruction prefix for co-processor instructions (e.g. FPU or PMMU). Note that this will only break on unhandled F-line instructions that will call the trap handler and will not break on e.g. a valid FPU instruction.
- Interrupt level breakpoint: breaks when the CPU's interrupt level is raised (by hardware); e.g. when an autovector interrupt of a certain level is raised.
- Exception vector breakpoint: breaks when the CPU jumps to the specified exception vector.
Managing breakpoints
To set new and manage current breakpoints, open the Breakpoints dialog using the 'View > Breakpoints' menu item.
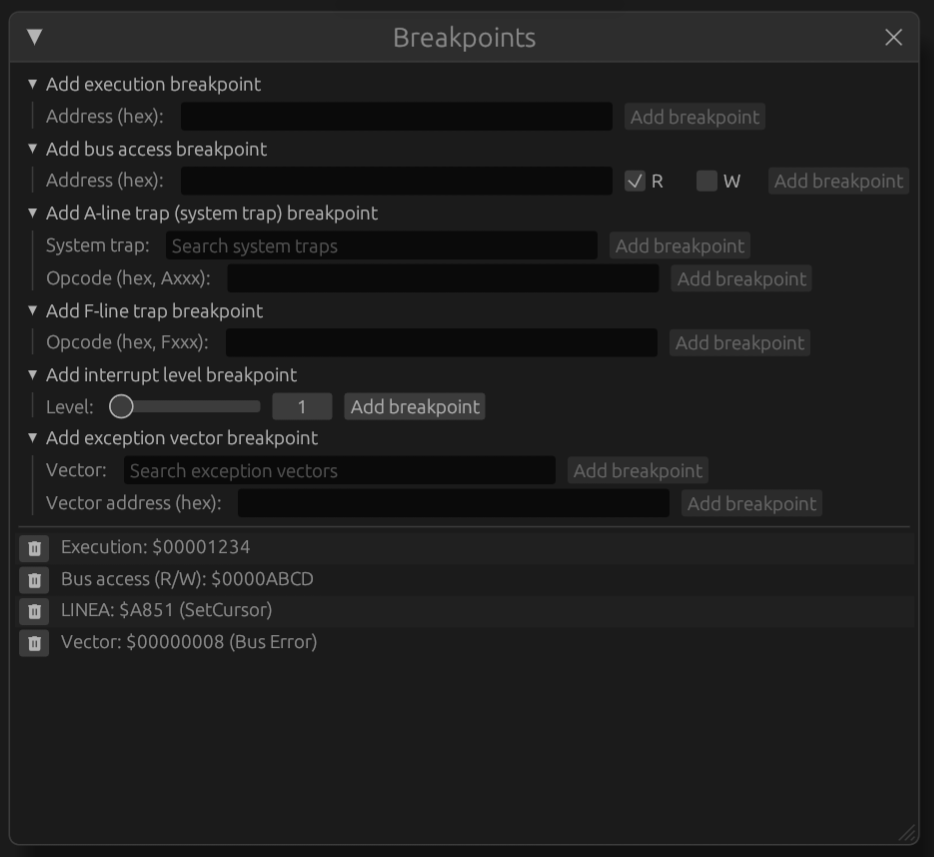
Use the appropriate dropdown to manually add breakpoints. To remove a breakpoint, click the delete button.
Adding breakpoints
Breakpoints can be added manually using the Breakpoints dialog but also added by right-clicking an address visible anywhere in the user interface and clicking a context menu item:
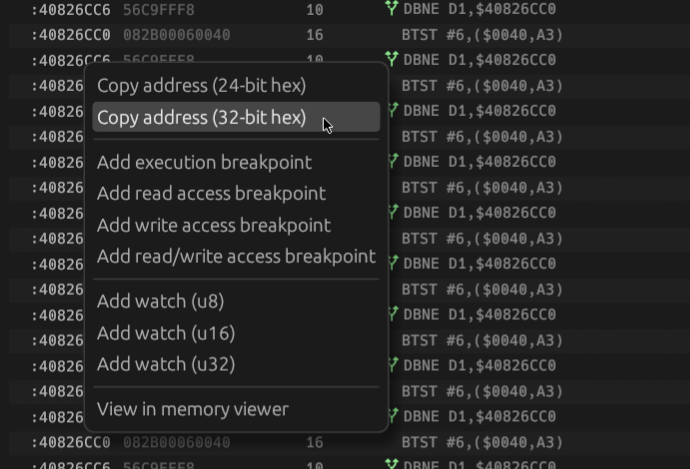
Execution breakpoints can also be added or removed by clicking the red circle in the disassembly view.
Registers
The registers view shows the current register state of the emulated CPU. It can be opened using the 'View > Registers' menu item.
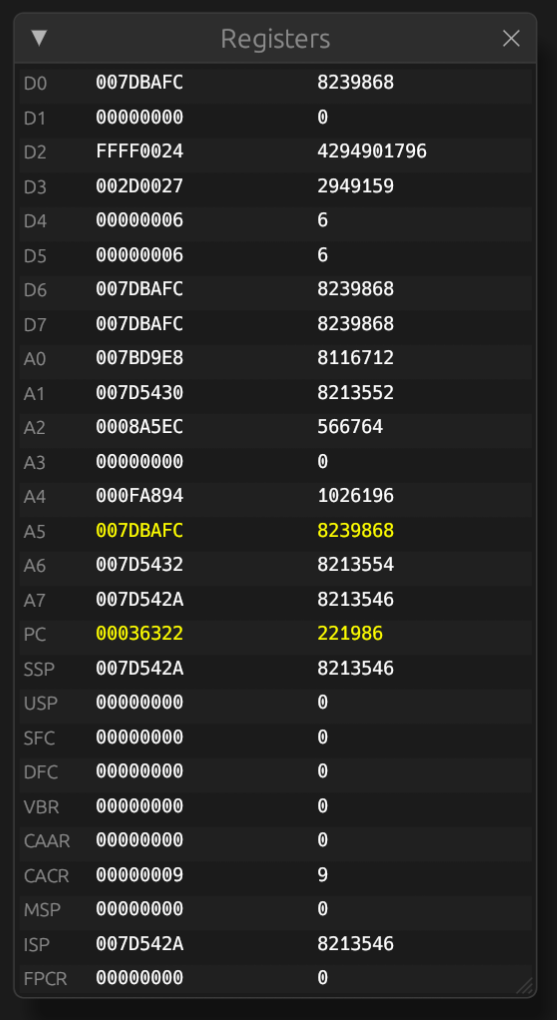
The first column shows the register name, the second column shows the current value in hexadecimal and the third column shows the current value in decimal.
If a value has changed since the last update, that value shows in yellow.
Right-clicking on the value of an address register, stack pointer or program counter opens a context menu with common actions for addresses.
Editing
To edit a register value, left click on the hexadecimal value of a register and edit the hexadecimal value. Pressing ENTER or clicking anywhere applies the change. To cancel the change, press ESCAPE.
Disassembly
The disassembly view shows a linear disassembly of instructions from the address in PC onwards. Note that this is not necessarily the same as the next instructions that will be executed by the CPU.
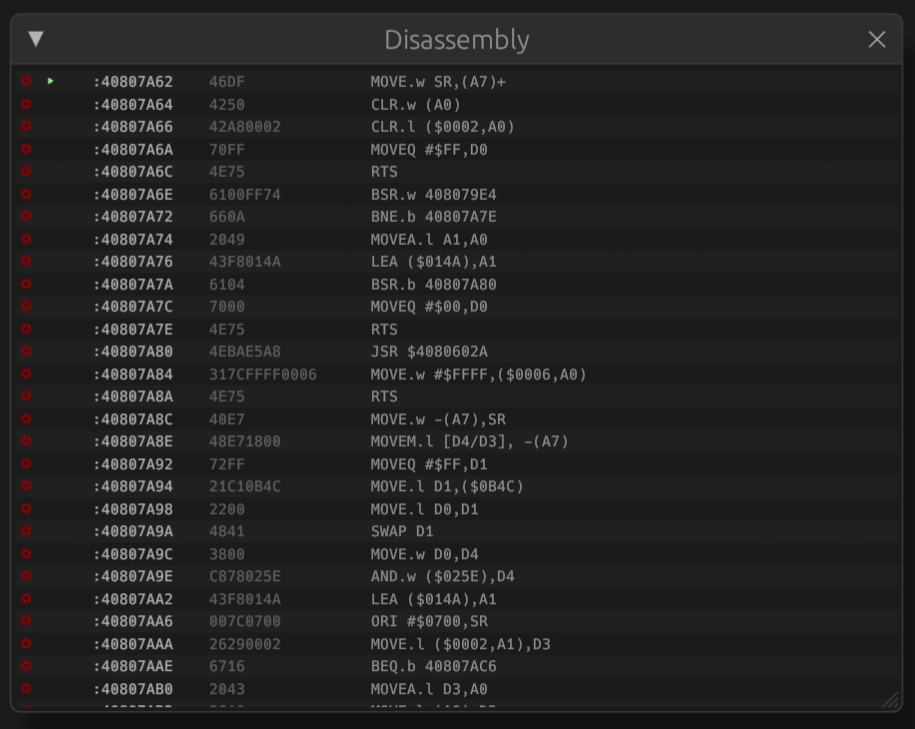
It can be opened through the 'View > Disassembly' menu item.
The disassembly view shows the following columns:
- Status/breakpoint, icons meaning:
- radio_button_unchecked - no breakpoint set on this address. Click to set a breakpoint.
- radio_button_checked - breakpoint set on this address. Click to remove breakpoint.
- play_arrow - next instruction to be executed (PC at this address).
- Address of the instruction. Right-clicking the address opens a context menu with actions for this address.
- Raw complete instruction in hex format
- Text representation of the instruction. A-line instructions are annotated with the name of the system trap.
Instruction history
The instruction history view shows a trace of the instructions executed by the CPU and the effect of these instructions. The instruction history view can be opened using the 'View > Instruction history' menu item.

The instruction history dialog has the following actions in the toolbar:
- save - exports the trace to a pipe-separated file.
In the table the last executed instruction is shown at the bottom. The table in the dialog shows the following columns:
- play_arrow - last instruction to be executed
- Address: the address the instruction was fetched from.
- Raw: complete instruction in hex format
- Cycles: amount of CPU clock cycles spent on this instruction.
An hourglass_top
icon indicates that wait states were incurred during instruction or data
fetch for this instruction.
If the CPU has I-cache and it is enabled, a cache state indicator will appear
in front of the cycles cell:
- speed indicates a cache hit for the entire instruction,
- speed indicates a cache hit for part of the instruction,
- speed indicates a cache miss for the entire instruction.
- Instruction: text representation of the instruction. A-line instructions are
annotated with the name of the system trap.
On branch instructions, a branch indicator shows if the branch was taken:
- alt_route indicates the branch taken,
- alt_route indicates the branch was not taken.
- EA: calculated Effective Address on which the operation of the instruction was executed. This may be empty if the instruction does not operate on memory
- Changes: a list of CPU registers and flags that were changed by the instruction
Exceptions and interrupts
If during execution an exception or interrupt is raised and the CPU jumps to the handler, a row with a blue background color is shown in the instruction history table naming the exception or interrupt that was raised and the amount of cycles taken.
System trap history
The system trap history view shows a trace of the system traps executed by the emulated system.
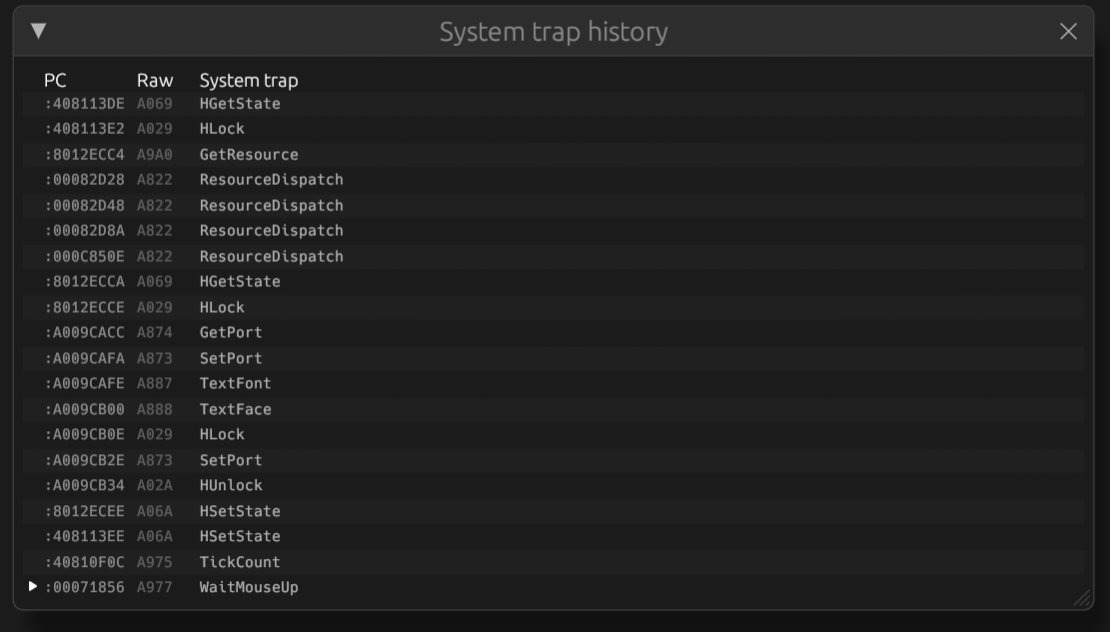
The system trap history view can be opened using the 'View > System trap history' menu item.
In the table the last executed system trap is shown at the bottom. The table in the dialog shows the following columns:
- PC: the address the A-line instruction was fetched from
- Raw: complete instruction in hex format
- System trap: the name of trap
Peripherals
The peripherals debug view shows registers and other state of system components, such as the VIA, SCC, NuBus cards and other components. The shown components differ depending on which Macintosh model is emulated and the enabled options.

To open this view, use the 'View > Peripherals' menu item.
The window contains a tree view of items. The arrows in front of items can be used to expand them and view sub-items.
Memory viewer
The memory viewer allows viewing and editing system RAM of the emulated system.
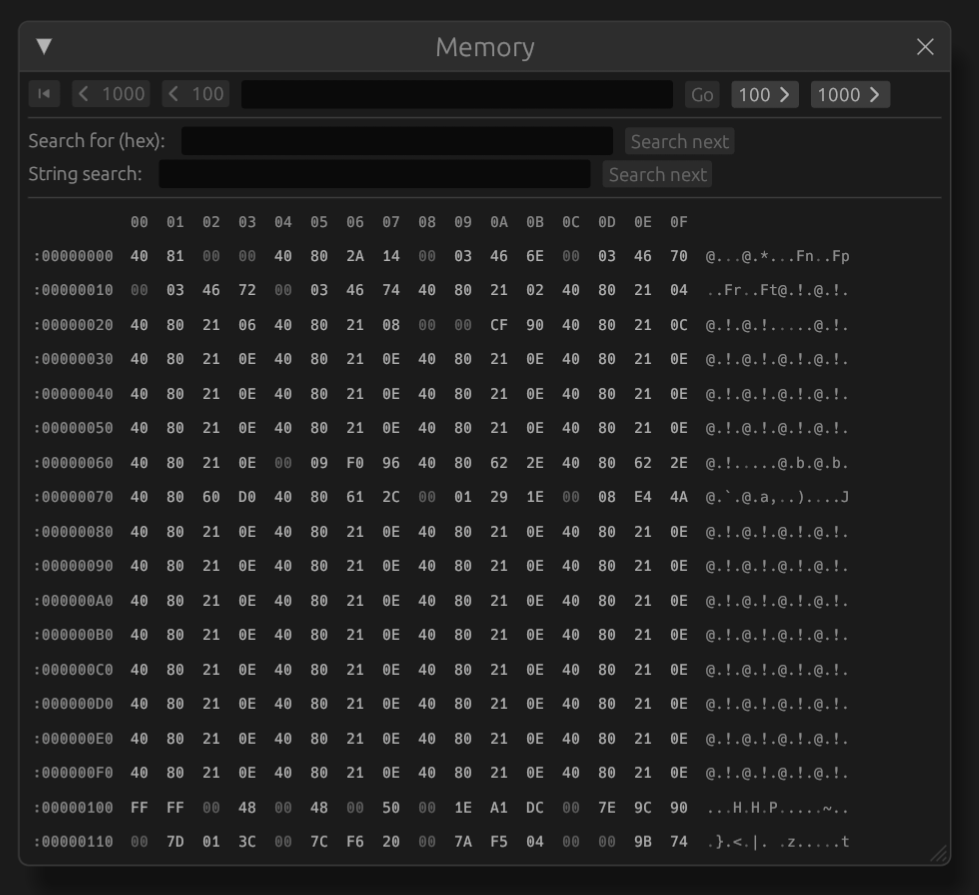
The viewer can be opened through the 'View > Memory' menu item.
The table shows the address of the leftmost byte in the first column. Following addresses can be identified by the byte ruler at the top. Hexadecimal values of each byte show in the middle and to the right an ASCII-representation of the 16 bytes is shown.
When a value has been changed recently, the value text lights up in yellow.
Navigating memory
To skip to an address, enter the address in the top textbox (in hexadecimal) and click 'Go'. The skip_previous button skips back to the beginning of the RAM (address 0) and the skip_next button skips to the end. The other buttons skip backwards or forwards by $100 or $1000 bytes.
Editing memory
To edit a value, simply click on it, change the value in the textbox that appears and press ENTER or click anywhere. To cancel editing press ESCAPE.
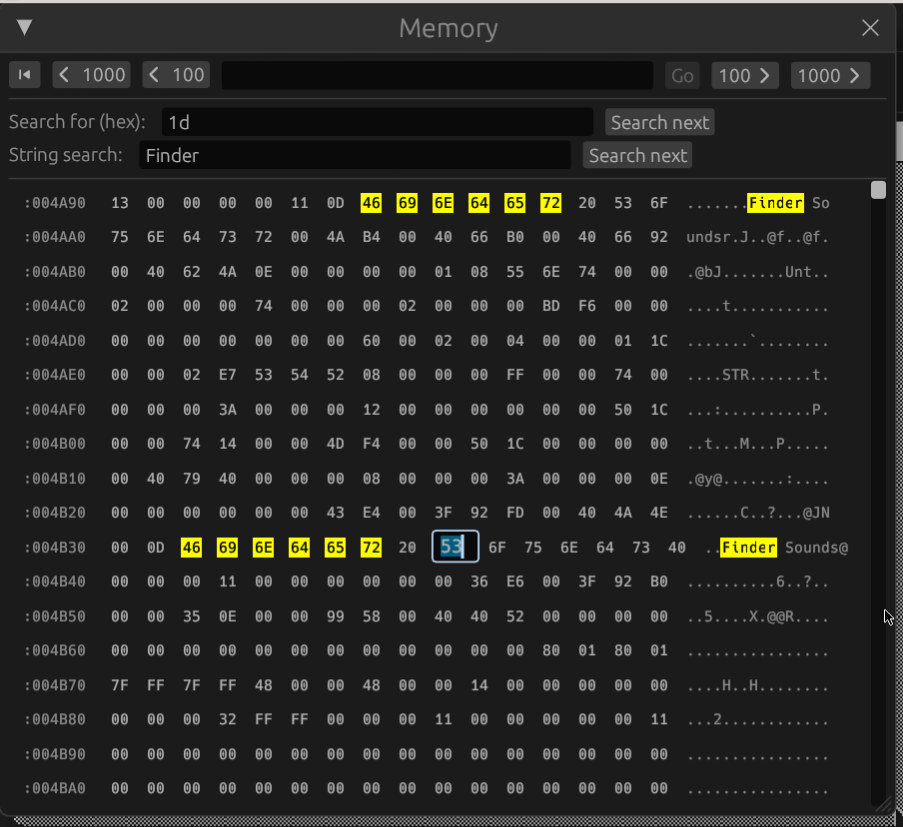
Searching
Snow provides two search options:
- Searching for a hexadecimal value (of any length). Enter the value in the 'Search for (hex)' textbox and click 'Find next'.
- Searching for (ASCII) strings. Enter the string to be found in the 'String sewrch' textbox and click 'Find next'.
Searching will always start from the top address currently shown in the viewer and will wrap-around when the end of memory is reached. The search needle will be highlighted in the memory viewer with a yellow background color.
Watchpoints
To set up watchpoints, either right-click on an address anywhere in the UI to open a context menu with options to add watchpoints, or open the 'Watchpoints' dialog through the 'View > Watchpoints' menu item.
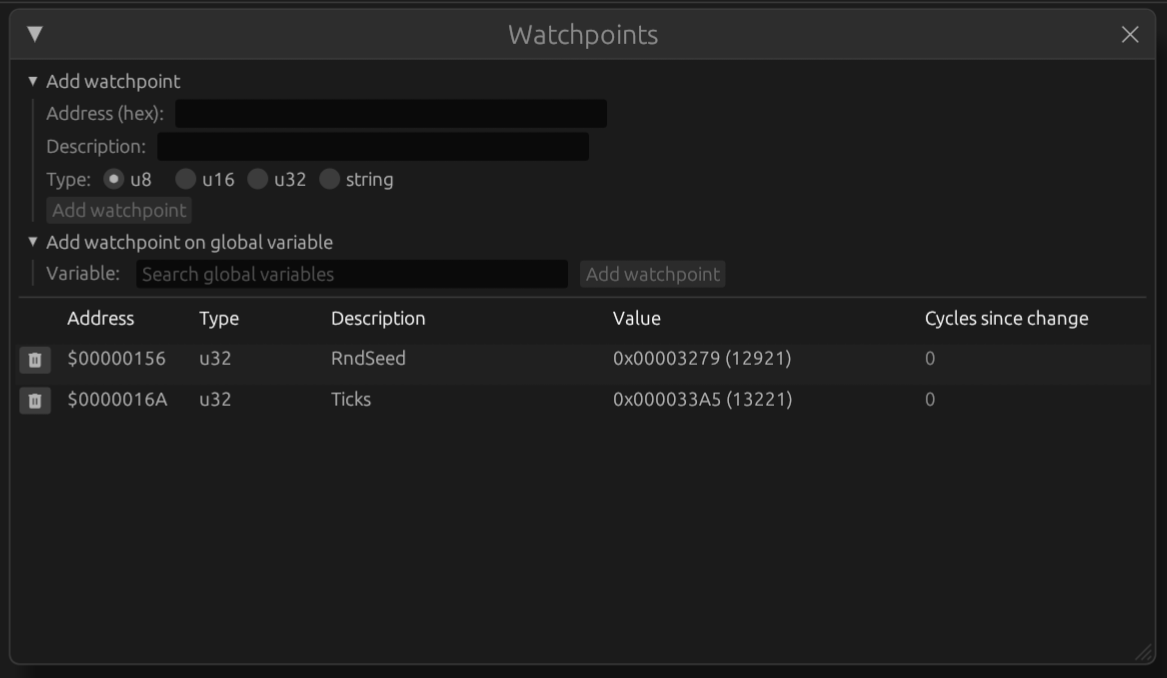
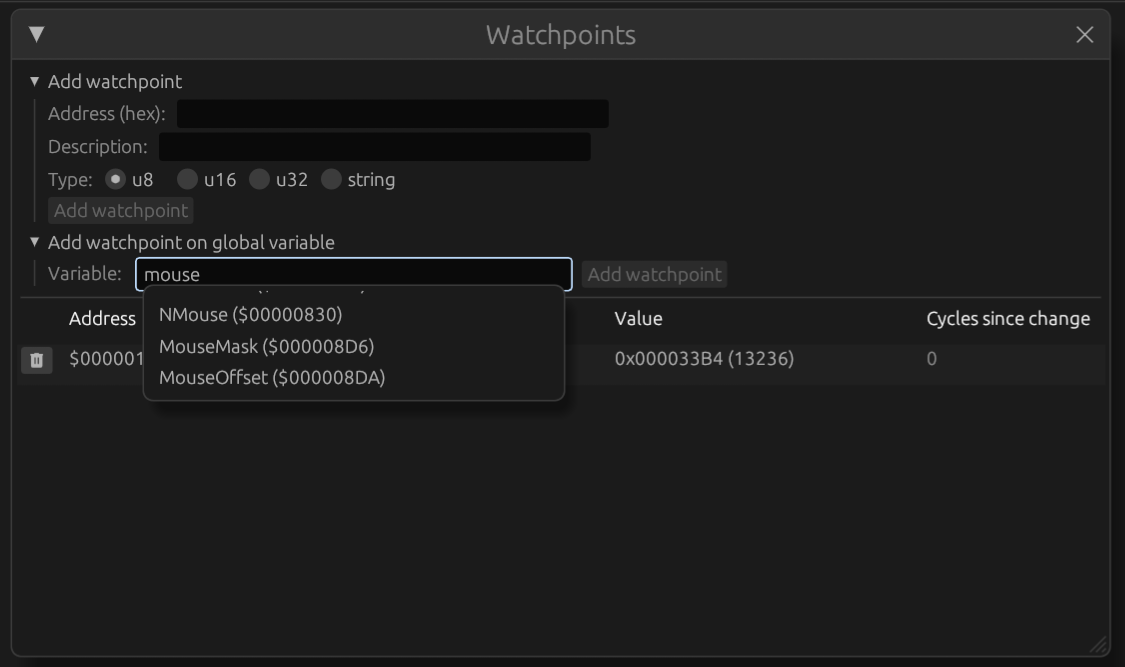
In the dialog you can add watchpoints and view existing ones. The columns contain the address of the watchpoint (in hexadecimal), an optional description, the current value and how many CPU cycles have passed since it was last changed.
A watchpoint of which the value recently changed lights up in yellow.
Adding watchpoints
You can add a watchpoint on any address shown in the UI by right-clicking it and selecting 'Add watch'.
You can also expand the 'Add watchpoint' dropdown in the 'Watchpoints' dialog, enter an address, data type and optional description and click 'Add watchpoint'.
Snow includes a catalog of static global variables used by the Mac ROM and MacOS operating system. When you open the 'Add watchpoint on global variable' dropdown, you can search for the names of globals, see their description and data type and add them as watchpoint immediately.
Removing watchpoints
Click the delete button to remove a watchpoint.
Converting volume images
For hard drives, Snow uses 'device images' where other emulators, such as Mini vMac, use 'volume images'. See working with hard drives for more information.
Using Disk Jockey (MacOS/Windows)
Disk Jockey is an easy tool to, among other things, convert a volume image to a device image. This guide explains the steps to do a basic conversion.
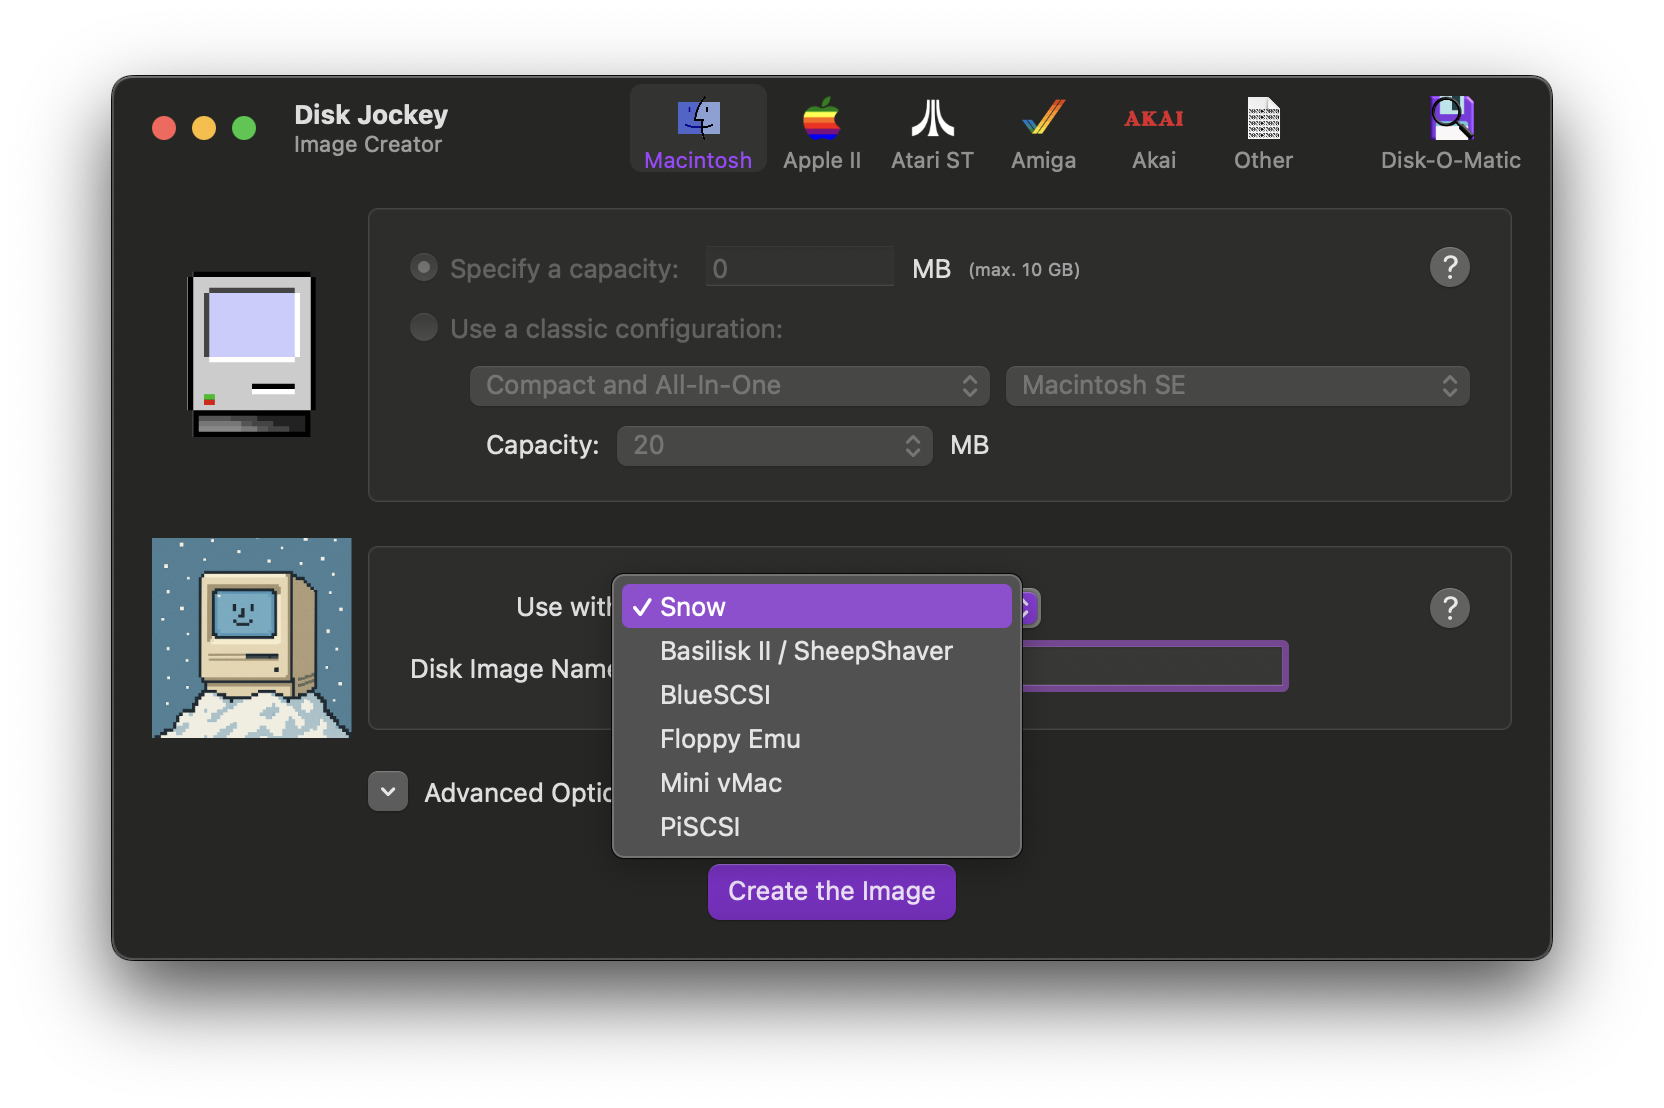
After starting Disk Jockey, first select 'Snow' as the product to use the new image with. If your version of Disk Jockey does not show 'Snow' in the list, you can also choose 'BlueSCSI' as the image files are compatible.
You can change the filename of the new image in the 'Disk Image Name' field.
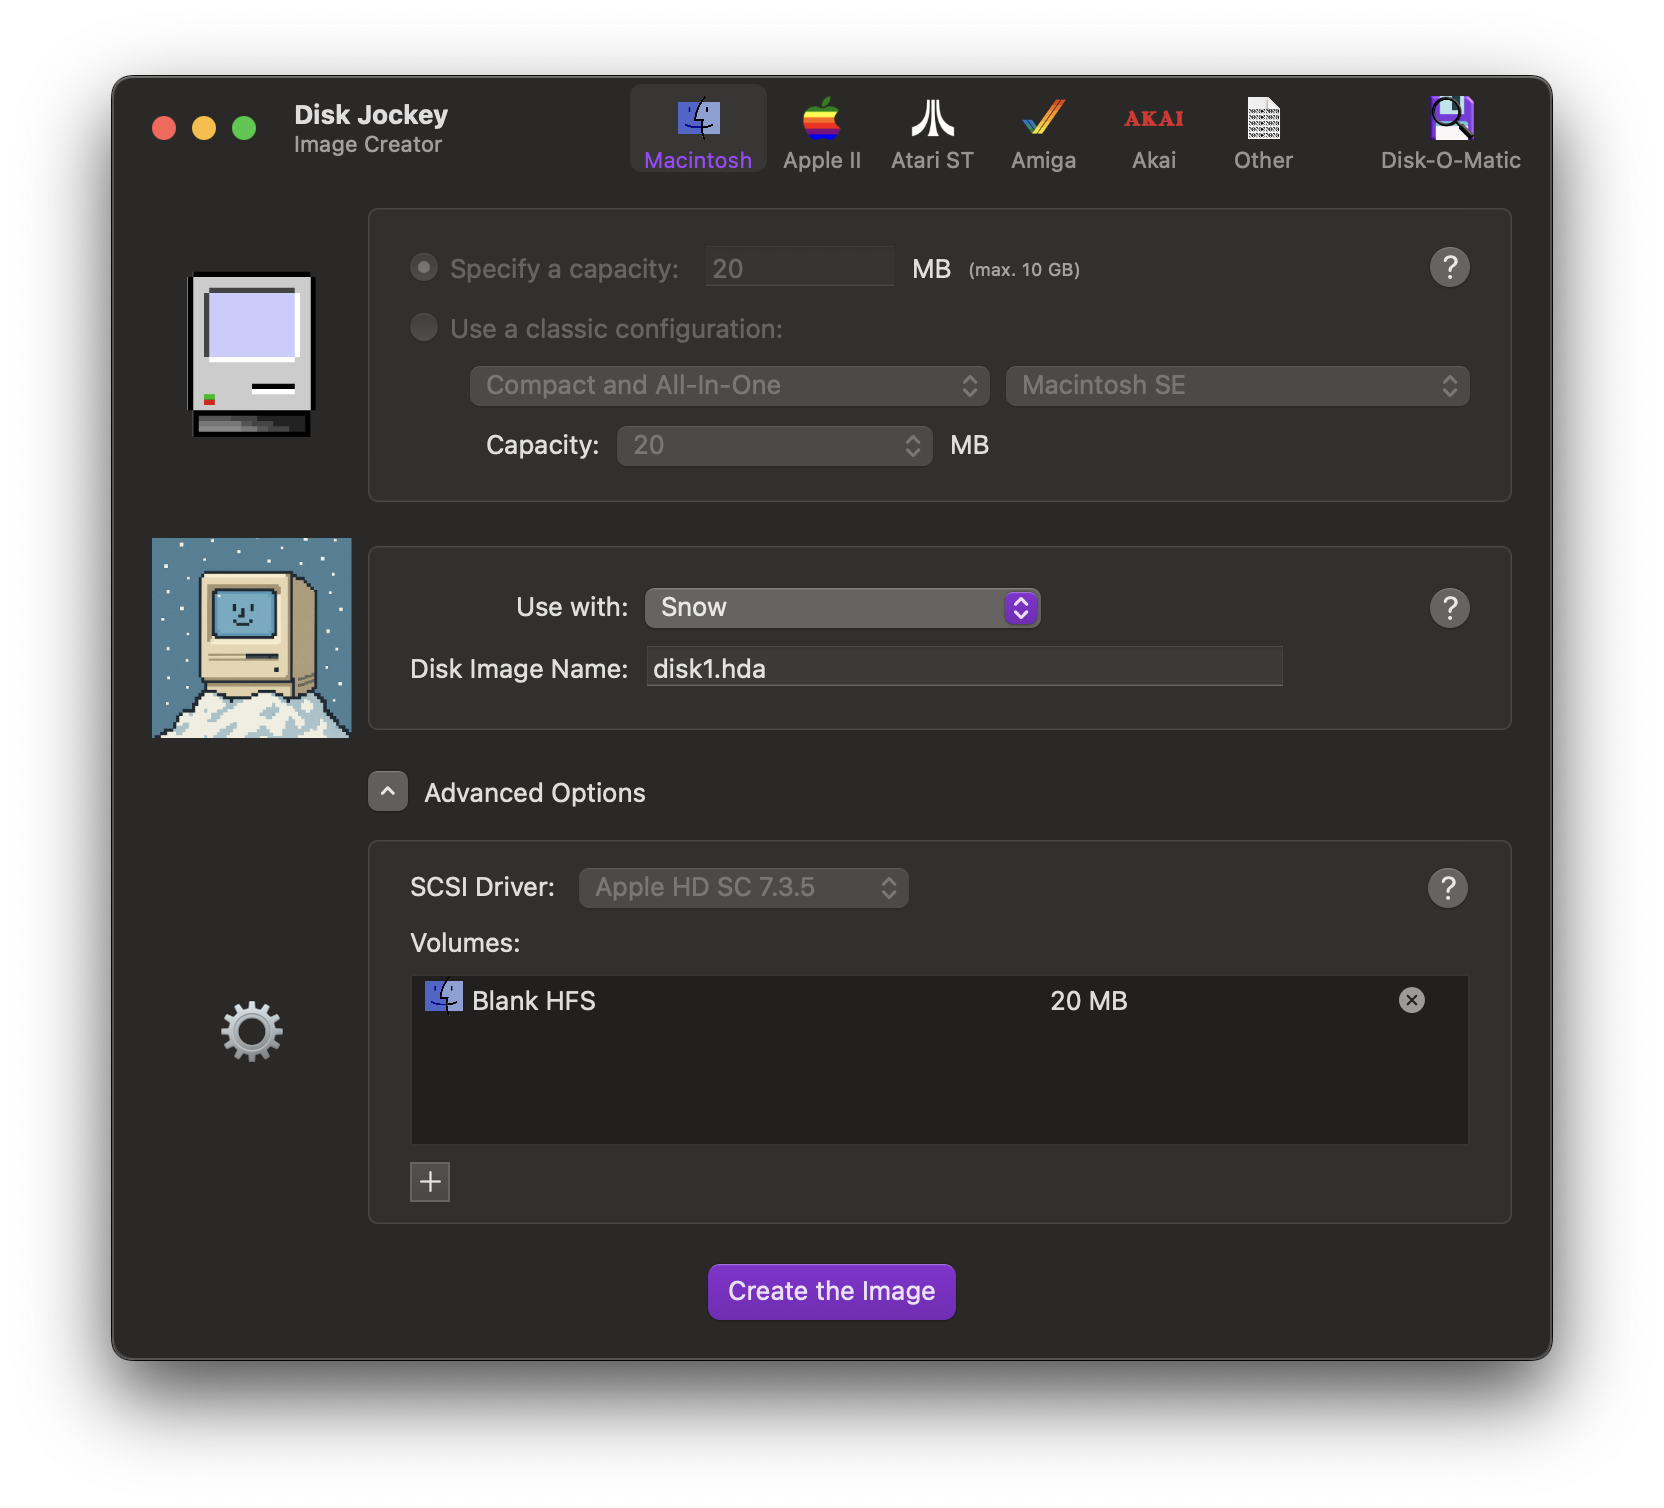
Then, click the 'X' next to the default 'Blank HFS' partition to delete it and then click the '+' button to create a new partition.
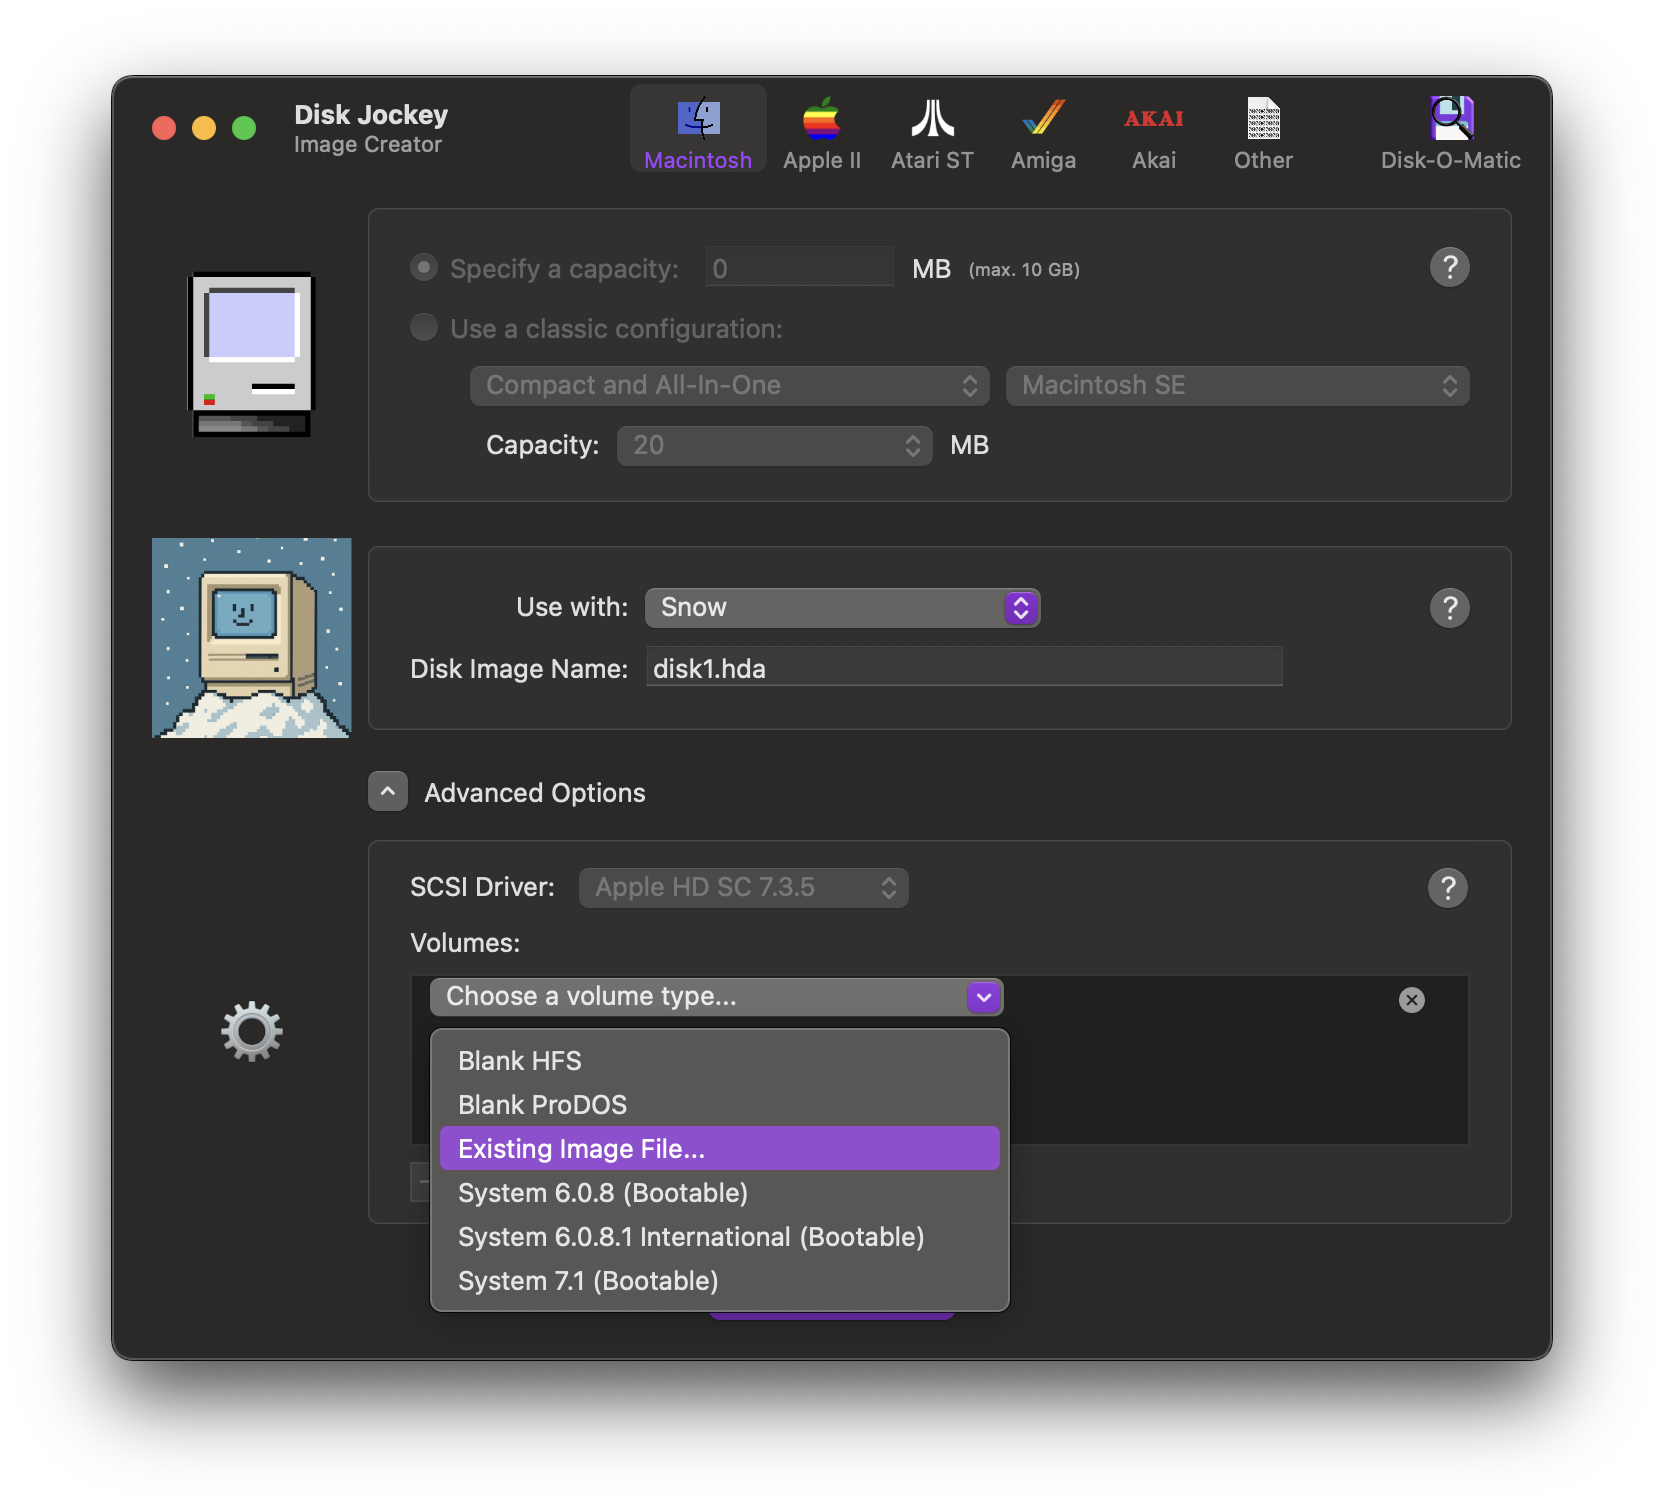
Now, select 'Existing image...' from the dropdown and select the volume image file in the file browser that appears.
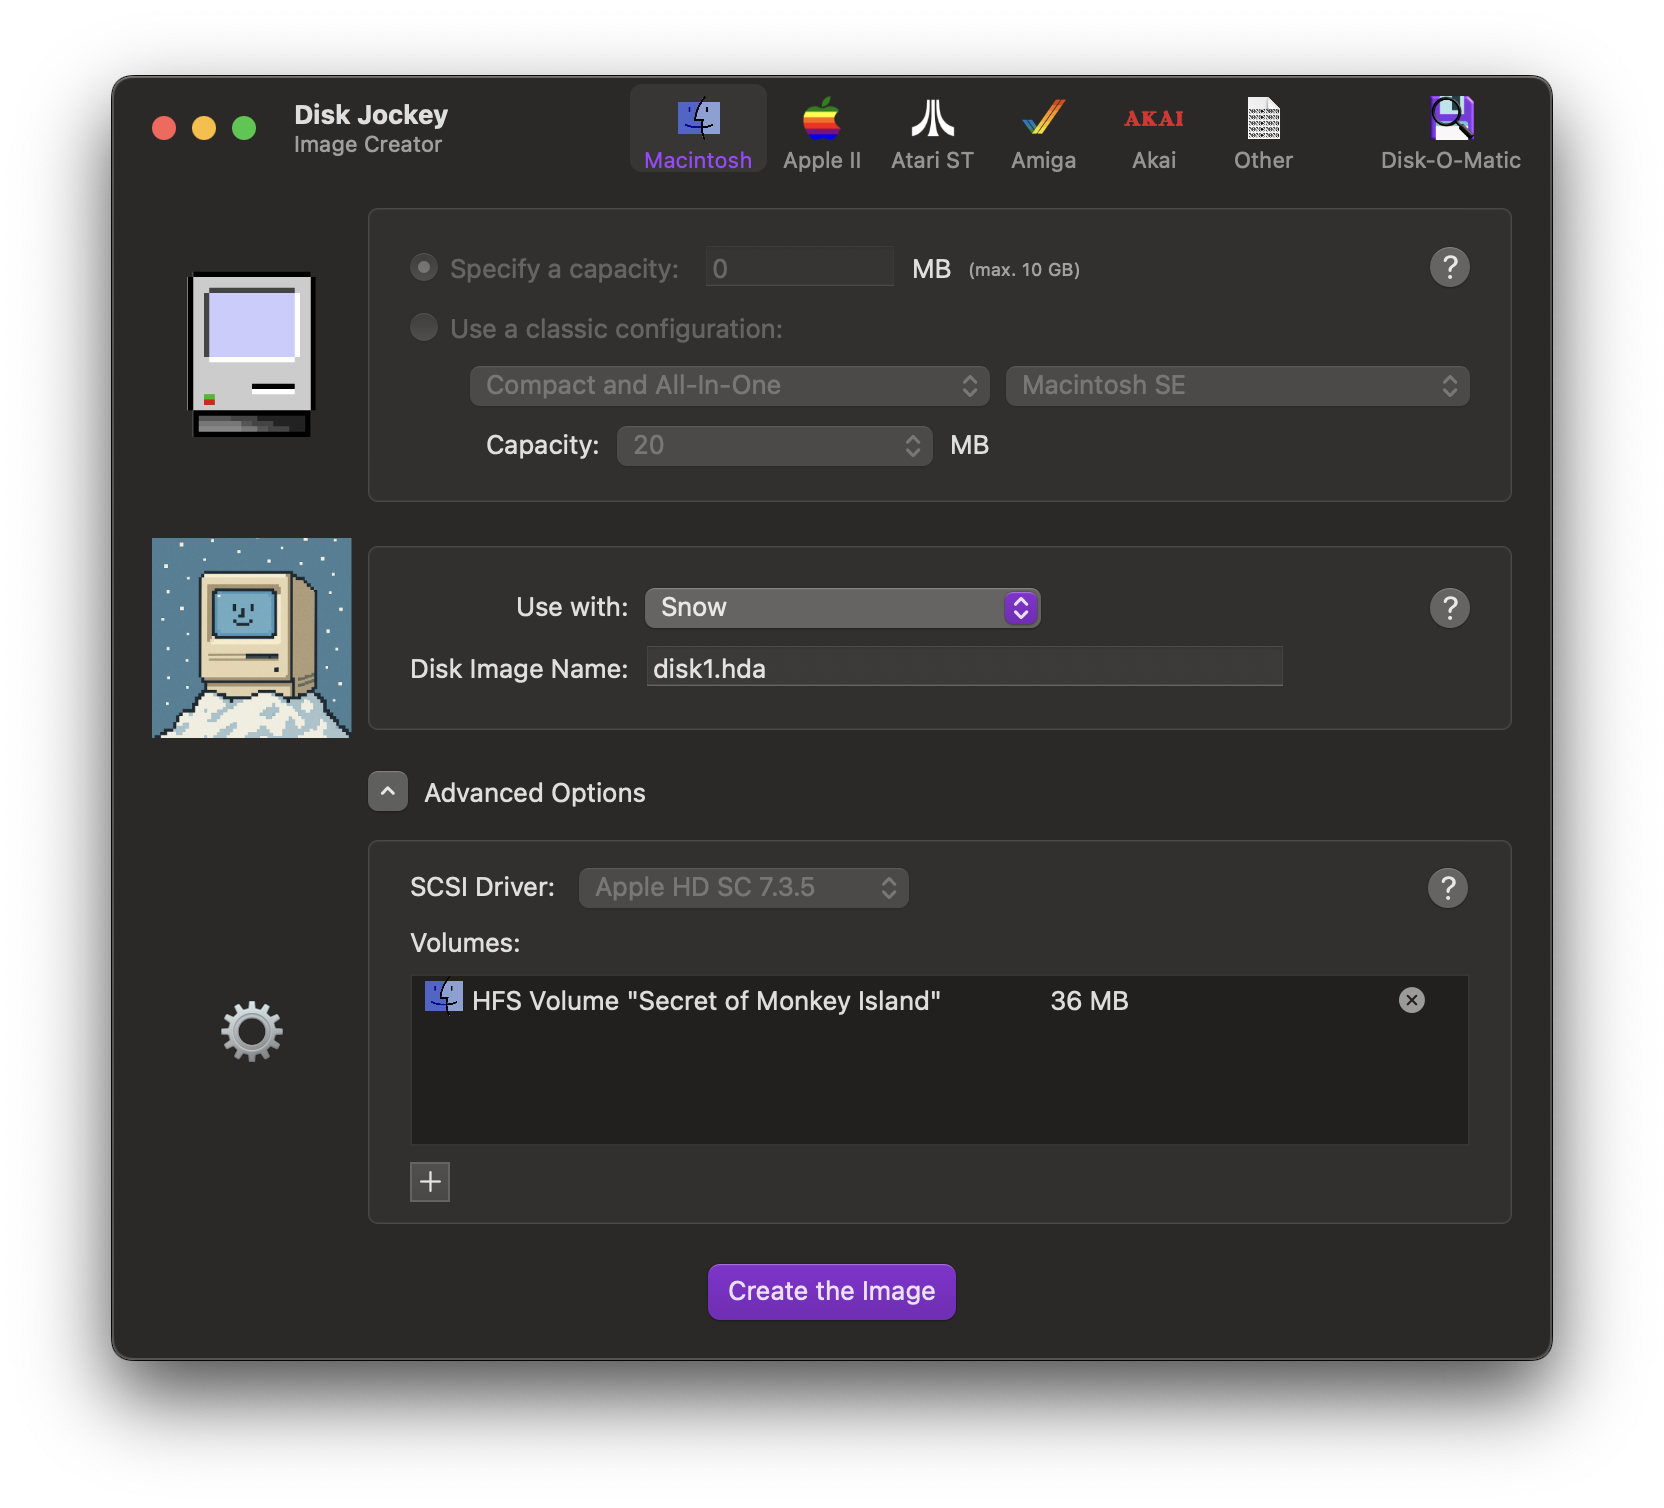
You should see your volume appear, including the volume. You can create more partitions on the same disk, if desired.
When you are finished, click 'Create the image' and save the image file to the desired location. Your image file is now ready for use. See working with hard drives on how to load the image file in Snow.
Using Disk Jockey Jr. (MacOS/Linux)
Disk Jockey Jr. is a command line tool from the same author that can convert volume images to device images.
To convert a volume image to a device image usable by Snow, run:
djjr convert to-device <input file.dsk> <output file.hda>
See working with hard drives on how to load the image file in Snow.